Showing posts with label Pastry. Show all posts

Saturday, July 11, 2020

"Dangerous Liaisons" Lemon Tart

I was a theater major in high-school, and for our final exam we mounted a rather ambitious production of "Dangerous Liaisons". Putting on this production was months of work, and at one point all of the cast and crew met up for a fancy picnic to work on the play (we were all kind of foodies as well as theater people). I don't remember all of the details, but I remember that we stayed up half the night preparing goodies for this picnic, and the queen of the goodies was this beautiful, summery lemon tart.

I seem to recall that we got the original recipe from a newspaper clipping which I no longer have. What I do still have is the recipe itself, which still appears in my notebook as the "Dangerous Liaisons Lemon Tart". It consists of a delicate and crispy tart shell, filled with a tangy lemon custard - a very different experience to the sweeter and more assertive lemon meringue pie.

As always, I made mine GF using a good flour mix (any mix will do), and in fact, using GF flour with short pastry means not having to worry so much about over-mixing, because there's no gluten to develop.

A Note on Eggs: the pie is not baked after the custard is put in, so the only heat the eggs get are by mixing over the double boiler. For food safety reasons, you want to make sure that your mixture reach a temperature of at least 72 C/160 F. It's best to use a food/candy thermometer for this, but if you don't have one then at least make sure that when you touch the mixture in the middle of the bowl it is uncomfortable hot to the touch. For me this coincided with the time the custard reached the correct consistency.

This recipe uses several egg yolks. If you don't want to waste the whites, why not try this recipe for chocolate-filled meringue cookies? 

"Dangerous Liaisons" Lemon Tart

Ingredients (for 28 cm/11 inch tart tin):

For the Crust: 
- 2 cups all purpose flour (gf is fine) 
- 1/3 cup sugar 
- grated zest from one lemon 
- 175 grams/6 oz cold butter, cubed 
- 1 egg yolk 
- 3 tbsp ice water 

For the Filling: 
- 4 eggs 
- 4 egg yolks 
- 3/4 cup fresh lemon juice (this is about 4 small lemons or 3 large ones, but may be more or less depending on how juice the lemons are)
- 3/4 cup white sugar 
- grated zest from two lemons 
- 100 grams/3.5 oz butter, room temperature and cut into small cubes 

Preparation: 
1. Dough: Put the flour, sugar and zest in a food processor bowl and mix briefly to combine . Add the cold butter and process until the mixture resembles little dough crumbs. (If you don't have  a food processor, you can do this by hand by cutting the butter into small cubes and then rubbing them into the flour with your fingers) Add the yolk and the cold water and mix just until the dough forms big clumps. Do NOT over mix. Combine a bit by hand, flatten to a round disc, wrap and chill for 30 minutes in the fridge. 

2. Preheat oven to 175 c/350 f. Lightly grease a 28 inch tart/pie tin.  On a lightly floured surface, roll the dough out to about a 30 cm/12 inch round, then flip onto the prepared tin. Press gently into the tin and trim any edged. Pierce the dough with a fork, then freeze, covered, for 15 minutes. (The cooling and freezing stages ensure that the butter is cold, ensuring a flaky, crispy shell)

3. Remove the dough from the freezer, cover with a sheet of baking parchment and top with dried beans or a baking weight. Bake for 35-40 minutes or until golden-brown. Remove the parchment and cool completely. 

4. Prepare the filling: in a medium metal or heat-proof glass bowl whisk together the eggs and the yolks using a wire whisk. Gradually add the lemon juice, whisking as you go. Then add the sugar and lemon zest and whisk until you have an even mixture. 

5. Take a medium pot sized so that the bowl can comfortably sit atop it without touching the bottom. Fill with a little bit of water and bring the water to a boil. With the pot still on the stove, place the bowl onto the pot and whisk, constantly, until the mixture reaches a thick custard consistency and is very warm to the touch (or measures 72 c/160 f with a food thermometer). 

6. Remove from heat, and begin whisking in the butter cubes, one by one, until each is completely incorporated into the mixture. Pour the filling into the cold shell. Gently tilt the pie to either side to smooth the custard and make sure if fully fills the tin. Refrigerate until the filling is set, about 4-5 hours. 


Saturday, August 25, 2018

Scones with Home-Made Clotted Cream

I admit, I love a good British high tea. Finger sandwiches and elegant little cakes make me happy, but above all I can't resist a perfect scone, served with strawberry jam and fresh clotted cream.

For those who don't know it, clotted cream tastes like something of a hybrid between butter and whipped cream. It's rich, creamy, spreadable, but not sweet (hence the jam). In some places you can get store-bought packaged versions of it, but those are usually much less creamy and quite disappointing. I've tried making it at home before, but without success. So when a colleague recently posted about her luck making clotted cream at home using a method I hadn't tried before, I knew I had to try it, and it came out perfect!

Since I had clotted cream, I also had to make scones. I used this recipe as my guideline.  The ones you see in the picture are gluten free, made with a good quality all purpose GF flour. If you have one you can trust, give it a try.

Note: the clotted cream takes at least 20 hours to make, so make sure you plan ahead with it!

Scones with Home-Made Clotted Cream 


Clotted Cream (makes about 3/4 cup): 

Ingredient: 
-1.5 cup of heavy cream (try to find one that is not ultra-pasteurized, if you can)

Preparation: 
1.  Preheat your oven to a high temperature, about 190 C/374 F. When the oven is fully heated TURN IT OFF. We will be using the residual heat from the oven to make the cream.

2. Pour the heavy cream into a flat oven-safe dish. You want to have as much surface area as possible. Place the cream into the (turned-off!) oven, and leave it there for 12 hours (overnight is easiest). The cream should develop a weird-looking skin, and you may notice some separation of liquid. This is good.

3.  Carefully remove the dish from the oven, cover (e.g with cling wrap), and place in the refrigerator for 8 hours.

4.  Carefully skim the cream into a bowl. You essentially want to separate the harder, buttery top from the liquid in the bottom. Stir well until the skin is mixed into the cream.

5. At this point you will have clotted cream, but it may have some slightly harder bits in it because of the leftover skin. You can use the cream like this, if you like it. However, if you want to be a really perfect creamy texture, take a very fine sieve, and push the cream through the sieve to get rid of the chunkier bits. It's a bit of work to get all of the cream through, but well worth it!

Scones (makes 9 good-size scones):

Ingredients: 

 - 2 cups / 225 grams self-raising flour, or all purpose flour + 2 tsp of baking powder (if you have good all-purpose GF flour, you can use that).  
 
- pinch of salt

-  3.5 tbsp/ 55 grams  cold butter

-  2 tbsp/ 25 grams white sugar

- 3/4 cup / 150 ml milk

- 1 egg, beaten 


Preparation: 

1. Preheat oven to 220c/425 f. Line a baking sheet with parchment paper or lightly grease it.

2. Pour the flour into a large bowl and combine with the salt. Dice the butter into small dice, and add to the bowl. Using your fingers, rub the butter into the flour. The mixture should start to become crumbly and look a bit like sand.

3. Stir in the sugar and the milk until the mixture is just combined into a dough. It's very important not to over-work scones, or they won't rise properly.  You should get a dough that is soft and a little bit sticky. If it's too dry and crumbly, add a bit more milk, 1 tsp at a time. If it's too sticky then add a bit more flour, but be careful not to add to much flour or the dough will become hard.

4. Lightly flour a surface and turn the dough onto it. Knead very lightly (again, do not overwork!), and form a round, about 2 cm/ 3/4 inch thick.  Use a 5 cm/2 in cookie cutter (or a round glass) to cut out the scones and place on the lined baking sheet. It's best to use a sharp cutter and to cut firmly in one quick movement ,as too much messing around with the edges tends to seal them, which prevents rising. Take any left-over dough and gently knead it back into a round to cut some more scones.

5. Brush the tops of the scones with the beaten egg, and bake in the oven for 12-15 minutes, until risen and golden.  Allow to cool on a wire rack, and serve with clotted cream and good jam.

Enjoy!

Saturday, June 9, 2018

Knish (Onion and Potato Pastries)

A curious fact about Israel is that a lot of the foods typically associated with Jewish cuisine in the US, are virtually unknown to Israelis. For example, until a few years ago, you couldn't get a bagel in Israel to save your life, and even now supermarkets rarely sell them. Knishes are a similar deal. You can find Burkeas in every store, but I can't remember the last time I saw a knish anywhere.
So when a recurrences of pop-culture references to Knish made me crave some, there was no choice but to make them myself.

I opted for a version in which the potatoes and onion are mashed together to make a smooth filling, because I have a kid who will happily eat these just as long as there are no visible oniony-bits. If you prefer a bit more texture, add the onions in after you mash the potatoes.

The knishes can be made gluten free (the ones in the picture are!), but it does require having an excellent gluten free all purpose flour that you trust, as you do need to make a dough that is flexible enough to roll and delicious enough to eat.

Knish


 Ingredients (for 20-30 small knishes): 
For filling: 
- 3-4 potatoes (about 500 grams/1 lb), peeled and chopped into medium chunks.
- 1 large onion, diced.
- 3 tbsp oil, for frying.
- 1 tsp salt
- 1 tsp sugar (optional, although it gives a nice richness of flavor)
- 1/2 tsp black pepper 

For dough:
- 2 cups all purpose flour
- 1 tsp baking powder
- 1 egg
- 1/2 cup warm water
- 1/4 cup oil
- 1/2 tsp salt

For finishing: 
- 1 egg yolk beaten with a bit of milk

Preparation: 
1. Put the potatoes in a medium pot, cover with salted water, and cook on medium heat until the potatoes are soft. Drain.

2. While you wait, put frying oil in a pan, add the onions and cover. Sautee over medium-low heat until the onions are soft and translucent, then remove the lid and allow the onions to become golden-brown. Remove from heat.

3. Mash together the potatoes, onions, salt, sugar and pepper, either in a food processor, using a stick-blender, or using a masher, until very smooth. Remember: if you want to keep the onion texture, add the onions after the mashing process. Check for taste. The seasoning should be quite strong (stronger than you would want in mashed potatoes that you eat straight up), because there's only a bit of filling in each knish.

4. Prepare the dough: Preheat oven to 175 C/350 F. Line two baking sheets with parchment paper.  In a large bowl, beat the egg and water together, then add the oil and the salt and mix. Gradually add the flour, about 1/2 cup at a time, and mix thoroughly. When it starts to come together as a dough, start kneading, first in the bowl, then out on a well floured surface. The dough should feel smooth, not sticky, and elastic. If it's too sticky to knead comfortably, add some more flour. Knead for a few minutes to develop the gluten (or just until you have a usable nice dough, if you're making this GF).

5. Divide the dough into two balls. On a well floured surface, shape the first ball into a flat rectangle, and roll until very thin and quite large (about 30X20 cm, or 13X9 inches). Do the same with the other ball of dough.

6. Cut each rectangle into two, lengthwise (so you have two long and narrow pieces). Place about a quarter of the filling lengthwise along the center of each piece, then roll the dough (like a swiss roll) around the filling. Repeat for all the pieces.

7. Using a sharp knife, slice each roll into pieces, about 2.5 cm/1 inch long. Carefully lift each piece and place it, cut side down, in the baking tin, then gently push together the top section over the potato filling to slightly "close" the knish. This is a bit messy, and don't worry if it doesn't close altogether. The results are meant to be rustic.

8. When all of the knishes are placed on the baking tin, with a bit of distance between each one, brush them with the egg/milk mixture. Place in the over and bake for about 35-40 minutes, until the knishes are golden and fully baked.

Enjoy!


Saturday, September 6, 2014

Savory Sweet Potato Tart Tatin

This is a savory recipe for tart tatin taken from here. It involves layers of caramelized sweet potatoes combined with goat cheese in a puff pastry shell.

Sadly, this recipe cannot easily be made gluten free unless you have access to gluten free puff pastry. In some places this is readily available. In other places it doesn't exist.

The original recipe is garnished with tahini, but I didn't find that a good flavor combination with this, so up to you. 

Note: you will need an oven-safe skillet 26 cms/10 inches in diameter.


Savory Sweet Potato Tart Tatin


Ingredients (for a 26 cm/10 inch tart): 

- 500 grams/ 1 lb puff pastry.
-  3-4 medium sweet potatoes (or 2 large), peeled and thinly sliced. [You should have about 500 grams/1 lb after peeling]. 
- 1 "log" (approximately 200 grams/7 oz) of fresh goat's cheese, thinly sliced.

For the Caramel:
- 1/2 cup sugar 
- 1/4 cup boiling water
- 2 tbsp olive oil 
- 1 tsp salt
- 1 tsp ground black pepper

Preparation: 
1. In a 26 cm/10 inch oven safe skillet, prepare the caramel. Place the sugar in the skillet on a medium heat and melt the sugar to a dark caramel. Do not stir with a spoon. Instead, gently swirl the skillet around to stir. When the sugar is melted and fairly dark, add the boiling water 1 tbsp at time, swirling the skillet constantly. Add the olive oil, salt and pepper. Again, stir by swirling, not with a spoon, or the caramel will seize up. 

2. Preheat oven to 200 c/400 f. Put the sweet potato slices in a large bowl and add the caramel, tossing them together so that the potatoes are coated. In the same oven safe skillet, arrange the potatoes like roof tiles to cover the skillet, drizzle with a few tbsp of the leftover caramel. Put the potatoes in the hot oven and roast for 10 minutes. 

3. Remove the skillet from the oven and place the goat cheese slices on top of the sweet potatoes. Roll out the puff pastry to a round/square about 1 inch/2 cm larger than the skillet. Carefully cover the skillet with the pastry, tuck in the pastry sides to form a tart shell, and prick with a fork all over to make holes for steam. Return the tart to the oven and bake for about 35 minutes, until the pastry is golden-brown and cooked through. 

4. Remove from the oven and allow to rest for 10 minutes. Take a large serving plate and place it upside down on the pastry, then carefully flip the pan and plate, and then remove the pan, so that the tart is on the plate, pastry down. Serve warm.
 

Friday, May 23, 2014

Cinnamon, Sour Cream and Hazelnut Cake

The first participant in the cookbook project is a lovely cake that would go great with tea or coffee in the afternoon.

The sour cream gives it a lovely moistness, and the cinnamon and brown sugar make it sweet and yummy.

I made it here with Cup4Cup gluten free flour and it came out great. If you have a GF flour mixture that you trust, give it a try. 

The book: "The Sweet Collection" (HaOsef Hamatok), by Israeli food empire "Al Hashulchan".
Language: Hebrew
Genre: sweet pastries and desserts
Veg Status: All of the recipes in the book are vegetarian. A few are vegan, but they are definitely in the minority.
GF Status: Like most baking books, it is not GF friendly, although there are some recipes for fancy, rich, mousse-type cakes that are naturally gluten free. Other recipes will require substitution with a good gluten free flour.

Cinnamon, Sour Cream and Hazelnut Cake


Ingredients: 

- 1 and 1/4 cup all purpose flour (or a gluten free equivalent that you trust)
- 1 tsp baking powder
- 1/2 tsp baking soda
- 1 cup (200 grams) white sugar
- 2 eggs
- 125 grams/about 4 oz butter, softened
- 200 ml/6.5 oz sour cream (I didn't have enough, so I used a combination of sour cream and a low-fat cream cheese)

For the filling
- 60 grams/1/3 cup dark brown sugar
- 100 grams/1 cup hazelnuts, lightly roasted and finely chopped (I used a combination of hazelnuts and almonds)
- 1 tbsp ground cinnamon

Preparation: 

1. Preheat oven to  200 C/390 F. Lightly grease a loaf tin or a small bundt cake tin.
2. In a bowl, combine the flour, baking soda and baking powder.
3. In a mixer, mix sugar, eggs and butter until smooth. Slow the mixer down and add the sour cream and flour gradually: 3 tbsp of flour, allow to mix, 1 tbsp of sour cream, allow to mix, and so on, until they are all mixed in and there is a  smooth batter.
4. Combine all of the filling ingredients together.
5. Put half of the batter in the baking tin. Top evenly with the filling. Top with the remainder of the batter.
6. Bake in preheated oven for about 35 minutes, or until a toothpick inserted in the middle of the cake comes out clean.


Monday, December 3, 2012

Personal Tartlets with various fillings

These little mini-tarts are a perfect party dish, because they are very easy to make, taste great, and are very easy to serve. These are just a few suggested fillings, but you can use whatever you want with the same technique.

I also made a gluten free version of these using Cup4Cup flour and the recipe here. It came out great (the tarts in the picture are gluten free).


Personal Tartlets


 To make these, you need to start out with a sheet of thinly rolled puff pastry, and a cupcake tin (one standard American pack of puff pastry made between 9-12 tarts for me).  Cut the puff pastry into squares, and line each hole of the cupcake tin with one square, to make little pastry "cups".  Fill the cups with whatever filling you want, and bake in a hot oven (430 f/200 C) for about 20 minutes, or until the pastry is golden-brown and fully cooked.

Sweet Potato Filling (for 12 tartlets):
- 2 large sweet potatoes, peeled and chopped into large chunks
- 1 pack of soft goat cheese
- A few sprigs of fresh thyme
- salt and pepper

Boil the potatoes in plenty of salted water, until soft. Drain and put in a bowl or return to pot. Mash the potatoes until quite smooth. Add the goat cheese and continue mashing until the cheese is fully incorporated into the potatoes. Season with salt and pepper and thyme leaves.

Potato filling: 
- 3 medium potatoes (or 2 very large), peeled and chopped into large chunks
- 2 tbsp milk (optional)
- handful grated cheese (cheddar or whatever you like) (optional)
- 2 eggs
- Salt, pepper, paprika

Boil the potatoes in plenty of salted water, until soft. Drain and put in a bowl or return to pot. Mosh the potatoes until smooth, adding the milk to help with creaminess. Add the cheese and eggs and mix well until incorporated. Season with salt, pepper and paprika.

Cheese filling:
This really isn't so much a recipe as an idea. Basically, take a bowl, and in it combine a mixture of softer and harder cheeses, as well as an egg or two and some seasoning, to create a thick liquid filling which you can pour into the cups. For my filling I use: 1 medium package of 2% greek yogurt, 1 small package of cream cheese or mascarpone, 2 eggs, and a couple of handfuls of a mixture of grated Parmesan and mozzarella, seasoned with salt and pepper. You can also add fresh herbs to the mix.


Wednesday, November 23, 2011

Krantz (yeast cake) with Nutella and Halva filling (with GF option)

This is a Krantz, which is a braided yeast cake (not to be confused with Frankfurter Kranz). You can fill the dough with any filling you like and braid it using the same technique. This particular version, made from a recipe from pastry chef Karin Goren is filled with Nutella and bits of halva - a middle-eastern treat made from sesame. However, if you can't get your hands on halva, just nutella will work as well.
The result is a firm, warm, fragrant cake, filled with gooey delicious chocolatey goodness.

For the gluten free version (which you see in the picture) I simply substituted the regular flour with the same weight of Cup4Cup gluten free flour, and it worked fabulously well. Easy to work with and delicious. I did have to add a tiny bit more milk to the dough to get it to mix, but other than that it was the same recipe. Since this is the third recipe I've published with this flour, I think I should make it clear that of course I am not an advertiser for the flour nor do I have any connections with C4C or its manufacturers. I've just been finding it a really great flour to work with. 


Krantz (yeast cake) with Nutella and Halva Filling 


Ingredients (for 2 cakes, each made in a small loaf pan or  "English cake" tin): 

For the dough:
- 500 grams/17 oz all purpose flour (or cup4cup gluten free flour)
- 1 tbsp active dry yeast
- 100 grams/3.5 oz/6 tbsp butter
- 150 ml (a little over 1/2 cup) milk
- 2 eggs, room temperature
- 6 tbsp sugar
- 1/2 tsp salt

For the filling: 
- 1 cup nutella
- 100 grams/3.5 oz halva ( In the US, Joyva makes gluten free halva)

- 1 egg, whisked, for egg wash

Preparation: 

1. In a mixer with a dough hook, combine the flour with the yeast. Melt the butter, allow to chill a bit, and add to the flour together with the milk, eggs and sugar. Mix in medium speed until you get a dough (if necessary, add a bit more milk). Add the salt, and keep working the dough in the mixer for another five minutes, until you get a smooth, shiny and slightly sticky dough. (Note: you can do all this by hand if you don't have a mixer)

2. Cover the bowl with plastic wrap, and leave the dough to rise in a warm place for a couple of hours, until doubled - or overnight in the fridge.

3. Divide the risen dough into two equal parts. Roll each dough into a rectangle about 1/2 cm/1/4 inch thick. Spread each rectangle with half of the Nutella spread and then sprinkle with half of the halva. Roll each rectangle into a roulade.

4. Slice one roulade down the middle, so that you get two lengths of dough layered with filling. Carefully turn the two pieces on their side, so that the part with the exposed filling is on top. Press one end of the two pieces together and then gently "braid" them (you can see the picture of this  here ). Do this for the other roulade, and gently transfer each one of them into a small loaf tin or long cake tin.

5. Allow the cakes to rise until about doubled. Gently brush with egg wash. Preheat oven to 180 C/350 F. Bake for about 25-30 minutes, until the cakes are fragrant and beautifully browned. If you gently knock on the dough, the cake will make a hollow sound. 

These are best served slightly warm, but are also delicious cold.


Friday, November 11, 2011

Challah (with GF option)

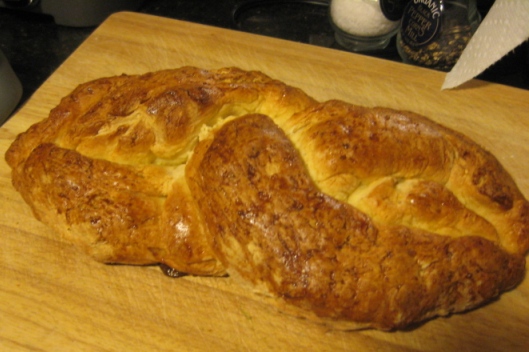
Making challah is really one of things that I like doing when I'm feeling a bit homesick or want to really feel like it's Friday. There's nothing like having the whole house smell of baking, and then get that beautiful golden loaf out of the oven. And if there are any leftovers, they also make the best french toast.  My favorite challahs are the ones that aren't particularly sweet, so this recipe is for a not-very-sweet challah.

The joy of baking challah is something I've mostly given up since celiac entered our lives, because messing around with all that flour is not a great idea. There is the GF challah recipe I posted on Rosh Hashana. However, it's complicated and the results, while decent, are not quite satisfying enough. Then this week I saw that Cup4Cup flour (the new flour I mentioned in a recent post) published a recipe for bagels that looked really easy and convincing. I gave it a try and was pretty happy with the results. I therefore decided that it was time to put this flour to the ultimate test: would it really work when used, cup for cup, instead of regular flour, in a regular recipe, for bread?!?
Most gluten free flours would fail this test outright. However, C4C actually did pretty well. The challah you see in the picture is, in fact, entirely gluten free. The dough behaved almost exactly like gluteny dough and was easy to work with. The result is not quite as fluffy and wonderful as regular fresh challah, but it's pretty darn close as a substitute! Overall, C4C deserves outstanding marks as a GF flour that really works.

So here is the Challah recipe, in it's regular, non-GF version, which can also be made GF using Cup4Cup flour.NOTE that the recipe does require quite a long rising and baking time, so don't make this at the last minute.

Challah


Ingredients (for one large challah loaf): 

- 1.25 cup warm water 
- 1.5 tsp active dry yeast 
- 1/4 cup of honey 
- 2 tbsp vegetable oil 
- 1 egg + extra for eggwash
- 1.5 tsp salt
- 4 cups all purpose flour (or GF Cup4Cup flour) + extra for flouring

Preparation: 

1. Pour the warm water into a large bowl. Sprinkle the yeast over the water. Add the honey, oil, egg and salt. Mix well. Gradually add in the flour, mixing as you go along (you can also use a mixer with dough hook for this). When the flour is incorporated, knead until you get a smooth dough that no longer feels sticky (if you are making the GF version, there's not much point in a lot of kneading, since there is no gluten to develop. Just knead it a bit until it feels like a cohesive dough that isn't too sticky). Cover the bowl with a clean damp kitchen towel and allow to rise for 1.5 hours. 

2. Punch down the risen dough and put on a floured surface (for GF dough you may need a bit more flour, if it feels a bit stick). Knead the dough for about five minutes (again, if you are using GF, just knead it a bit until it is easy to work with). Divide the dough into three equal parts, shape each part into a long snake, attach the three snakes at one end and then braid them. Oil a baking tin or cover it with parchment paper, and put the challah on the tin. if your challah looks a bit bumpy - which can happen especially with the GF dough, moisten your hands a bit with water and gently rub the challah with moistened hands to smooth it up a bit.   Cover with a damp kitchen towel and allow to rise for another hour. 

3. Preheat oven to 375 F/180 C. Brush the challah with egg. Bake for about 30-40 minutes, until the challah is golden-brown and makes a hollow sound when you knock on the bottom of it.  


Enjoy!

Mont Blanc (Meringue with chestnut cream)

This elegant dessert looks complicated, but it is actually quite simple to make. It consists of a meringue "bowl" topped with a rich yet fluffy chestnut cream. It is named, of course, after the mountain. I made it based on this recipe.


Mont Blanc


Ingredients (for six portions): 

For the Meringue: 
- 4 egg whites (I had trouble using boxed egg whites for this. They wouldn't fluff up.)
- 1 cup of sugar

For the cream:
- 150 grams (about 5-6 oz) peeled and cooked chestnuts (you can buy them in jars or vacuum sealed)
- 2/3 cup sugar
- 3/4 cup milk
- 250 ml (about 8 oz) whipping/heavy cream

- Crushed nuts or cocoa nibs, to decorate (optional)

Preparation: 

1. Make the meringue: in  a mixer, beat the egg whites until they form a soft foam. While beating, gradually add the sugar and continue beating until you get a very stiff foam with a nice glossy sheen to it.

2. Heat oven to 120 C/220 F. Line a baking sheet with parchment paper. Using a piping tool or just a spoon, create at least six small meringue "bowls" on the baking sheet. (I found that the easiest way to do this was to dump a heaping spoonful of meringue on the sheet, and then carefully use clean fingers in order to push the meringue open to create a bowl-like shape).  Bake the meringue in the oven for at least two hours, or until the bowls easily separate from the bottom of the baking parchment. Turn off the oven, and leave the meringues to cool inside it (this will take a few hours). Set aside. (You can put them in an airtight container and keep them outside the fridge for a few days). You can also just create one large meringue bowl.

3. Meanwhile, prepare the cream. In a medium pot, place the chestnuts, sugar and milk. Bring to a low boil, turn the heat down to a low heat, and simmer for about five minutes, stirring occasionally. Remove from heat and allow to cool a bit. Transfer to a blender or food processor and process until smooth. (You can try using an immersion/stick blender for this, but I couldn't get the desired smoothness that way).  Refrigerate until completely cool.

4. Whip the heavy cream until you get a stiff whipped cream. Gently fold the chestnut mixture into it. You will get a cream that has a slightly brownish color, but is mostly white. Chill until you are ready to serve.

5. Right before serving, place a meringue bowl on a each plate. Pipe or simply spoon the cream unto the bowl. Decorate with nuts or cocoa nibs and serve immediately.

Wednesday, September 28, 2011

Gluten Free Round Challah

It's the Jewish New Year (Rosh Hashana) tonight, and round challah bread is a traditional holiday food. The roundness of the challah symbolizes the circular nature of time, the fact that one year ends and another begins.

Several years ago I was determined to serve a gluten free challah for Rosh Hashana. I tried five different recipes, all of which came out wrong. Some looked pretty but tasted awful, while others tasted reasonable but baked up completely flat and failed to resemble a challah at all. And then I found this recipe from Gluten Free Sox Fan. The dough it made was sufficiently workable that I could actually create a nice round shape and the resulting bread was a decent approximation of challah.
I won't lie to you - it's not as good as the real thing. The bread is denser and less fluffy than real challah bread. But, it was good enough that when I served it to a table full of non-GF people, they all ate it and asked for seconds. 

Shana Tova!

Gluten Free Round Challah 


Ingredients (for one medium sized challah): 


- 1 cup warm water
- 1/4 cup sugar
- 1 1/2 teaspoons yeast
- 1 egg
- 2 egg yolks
- 3 tablespoons vegetable oil
- 1 teaspoon vinegar (I used apple cider vinegar)
- 3/4 cup brown rice flour
- 3/4 cup white rice flour
- 1/2 cup corn starch
- 1/2 cup tapioca starch
- 1/4 cup potato starch
- 1 tablespoon xanthan gum
- 1 teaspoon salt
- 1 egg, beaten, for egg wash (I used egg yolk, just because I had some left over from another recipe)

Preparation: 

1. Put the warm water, sugar and yeast in a small bowl and set aside until the yeast begins to rise and bubble (a few minutes).

2. In another small bowl, whisk together the egg, egg yolks, oil and vinegar (the egg may take on a strange consistency. This is fine).

3. In a large mixer bowl combine the brown rice flour, white rice flour, corn starch, tapioca starch, potato starch, xanthan gum and salt. Mix for a minute or so just to combine. Add the egg mixture and the yeast mixture, and knead using your mixer's dough hook until a dough is formed. (If you don't have a mixer, you can do this using a spoon/hands).

4. Lightly flour a piece of parchment paper with GF flour. Turn the dough out onto the floured surface and turn into a ball. Oil a bowl (I used the used mixer bowl) and put the dough in it, rolling it in the oil to coat. Cover the bowl with a clean kitchen towel and leave to rise about 30 minutes or until dough has doubled in size.

5. Preheat oven to 350 F/175 C. Line a baking tin with parchment paper. Gently take the oily dough out of the bowl and form into a rough circle. I found the dough was slightly difficult to work with, but sufficiently handable that it was possible to create a round shape, albeit not a very perfect one. Cover with a kitchen towel and allow to rise again for about 20 minutes. 

6. Brush the challah with egg wash, and bake for about 20 minutes, or until the challah looks ready and makes a slightly hollow sound when tapped on the bottom.


Saturday, July 16, 2011

Gluten free Chocolate Cupcakes with Pecan-Coconut Filling

At someone's recommendation I recently got Elana Amsterdam's Gluten Free Cupcake Book.
Initially, the recipes looked really exciting and interesting, but then I realized that every single recipe in the book uses agave nectar instead of sugar, and it doesn't even offer a substitution for sugar.
Now, I don't really see much reason to use agave nectar, especially in something you only eat once in a long time like cupcakes (and especially since agave is somewhat controversial health-wise), so I decided to try and convert the recipes back to sugar, and I experimented with this recipe, which came out pretty great.

The cupcakes themselves came out a little bit on the dry side, but once they were filled and frosted they were moist and delicious. They were particularly lovely after they had spent the night in the fridge.

GF Chocolate Cupcakes with Pecan-Coconut Filling 


Ingredients (for 9 cupcakes): 

For the Batter:
- 1/4 cup coconut flour 
- 1/4 cup unsweetened cocoa powder
- 1/4 tsp salt
- 1/2 tsp baking soda
- 4 large eggs
- 1/2 cup sugar syrup made by heating together 1 cup of sugar, 1/3 cup of water, and juice from 1/2 lemon in a saucepan over medium heat until the sugar is melted (but not browned). 
- 1/4 cup canola oil 


For the Ganache: 
- 3/4 cup heavy cream
- 1 and 1/3 cup (8 oz) bittersweet chocolate, chopped.
- 1 tsp pure vanilla extract
- a pinch of salt 

For Pecan-Coconut Frosting: 
- 2 egg yolks 
- 1 cup coconut milk
- 1/2 cup sugar syrup (see above) 
- 1/4 cup coconut oil
- 3/4 cup unsweetened shredded coconut 
- 1 cup pecans, toasted and coarsely chopped 

Preparation: 

1. Preheat oven to 350f/175 C. Line a cupcake/muffin tin with 9 paper liners. 
2. In a large bowl combine the coconut flour, cocoa powder, salt and baking soda. In another bowl whisk together the eggs, oil and sugar syrup. 

3. Add the wet ingredients into the dry ingredients and whisk vigorously until just mixed. Scoop 1/4 cup of the mixture into each of the 9 liners. Bake for 17-20 minutes, or until a toothpick stuck in the middle of a cupcake comes out with just a few crumbs. Let the cupcakes cool in a pan for 1 hour. 

4. Meanwhile, make the ganache: In a microwave safe bowl combine the cream and chocolate and heat for 1 minute in the microwave. Mix well to allow the chocolate to melt into the cream completely until they make a smooth chocolatey cream. If after 1 minute the chocolate isn't completely melted, heat it for another 30 seconds and melt again. When the chocolate it fully melted, add in the vanilla and salt, and refrigerate until the ganache is spreadable. 

5. Also make the frosting: in a saucepan combine the egg yolks, coconut milk, sugar syrup and coconut oil. Heat until just simmering while stirring vigorously the whole time, then continue cooking on a simmer (but not a boil!) for about 5 minutes. Using a fine sieve, sieve the mixture into a bowl, and mix in the pecans and coconut. Allow to cool, stirring occasionally, for about 30 minutes, and the refrigerate until it is relatively spreadable. 

6. Build the cupcakes: peel the cooled cupcakes out of their lines. Cut each cupcake in half horizontally. Spread the coconut-pecan frosting on the bottom part of each cupcake, then top with the top half of the cupcake. Spread the ganache around the sides of each cupcake, then top the cupcake with more of the coconut-pecan frosting. Refrigerate to allow the frosting to harden. 

Enjoy!

Friday, May 27, 2011

Simple Irish Cream Tiramisu

This recipe was published this week on the Israeli news website Ynet.
It's a delicious and elegant dessert that is very easy to make. You can make it in individual serving glasses, as I did below. You can also just make it in one large dish, if you prefer. The exact number of servings will depend on the size of dish you use and the way you choose to divide it.

I hesitated a bit before listing it as "easily gluten free". It is easy if you have access to gluten free ladyfingers, such as these excellent ones from Schar.  However, I think even if you don't have gluten free lady fingers, you can try to make this recipe with gluten free cookies, or even just make the cheese-cream mixture and serve it as a mousse. With regards to the Irish Cream, Bailey's has a somewhat ambiguous "gluten free" statement, but other companies (like Carolan's) are clearer about their claims.  You can also use an alternative such as Kahlua.

Simple Irish Cream Tiramisu 


Ingredients (for 5-10 portions, depending on container size): 
- 1 cup of strong coffee, at room temperature (you can make this in a coffee maker or combine 2 heaped tsp of instant coffee with one cup of water) 

- about 10-20 ladyfingers, depending on the size of the serving dishes

- 2 (225 gram) packs of mascarpone cheese (if you can't get mascarpone you can use another high-fat cream cheese, but mascarpone is best for this) 

- 1 cup (about 250 ml) whipping cream or heavy cream 

- 1/2 cup sugar 

- 1/4 cup Irish cream liqueur

- 2 tsp of cocoa powder 

Preparation: 

1. Place the coffee in a medium bowl (so that you can dip the ladyfingers in it) 
2. In a large bowl combine the mascarpone and the sugar. Add the Irish cream and mix well (the mixture will be quite liquid). 

3. Using a mixer, whip the cream into a sturdy whipped cream. Gently fold the whipped cream into the cheese mixture. 

4. Build the dish: dip the ladyfingers in the coffee and place at the bottom of the serving dishes (if you are using small dishes you may want to break them in half). Cover the ladyfingers with the cheese and cream mixture until about half the height of the serving dish. Add another layer of coffee-dipped ladyfingers. Cover with more cream mixture.  If you are using small serving dishes, repeat this for all of them.

5. Sprinkle the dish with cocoa powder (the easiest way to do this is to put a bit of cocoa in a fine sieve). Refrigerate for at least 2 hours (preferably overnight).


Saturday, April 23, 2011

Hazelnut and Chocolate Cake

This is a recipe by chef Oren Becker, which was published in Hebrew on Ynet.
It appears there as a Passover recipe, but it's also a great gluten free recipe.

I made this cake initially without the topping, but it was a little dull-looking, so I added the ganache topping and then drizzled it with white chocolate to make it prettier.

Hazelnut and Chocolate Cake 


Ingredients (for one 10-inch cake): 

For the bottom layer: 
- 4 egg whites
- 10 tablespoons of sugar, divided into two sets of 5 tbsps each
- 1.5 cups (140 grams/ about 5 oz) hazelnuts
- 15 grams/about 0.5 oz walnuts, finely ground

For the second layer: 
- 240 grams/8 oz bittersweet chocolate
- 75 grams/2.5 oz unsalted butter
- 1/4 tsp instant coffee powder (optional)
- 4 eggs
- 8 tbsp sugar

For the Topping (optional): 
- 100 grams/3.5 oz bittersweet chocolate 
- 0.5 cups heavy cream
- 30 grams/1 oz white chocolate

Preparation: 

1. Line a 10 inch round cake pan (preferably a deep spring-pan) with parchment paper.  (This will make it easier to take the cake out at the end, although it isn't necessary). Preheat oven to 170 C/350 F.

2. Put the hazelnuts in a small pan and cook over a small flame for a few minutes until golden, or roast them in the oven for about 10 minutes until the same. Allow them to chill slightly and then grind them in a food processor. Combine with 5 tbsp of sugar and the ground walnuts.

3. Using a mixer, beat the egg whites with 5 tbsp of sugar until you get a stiff foam.

4. Gently fold the nut mixture into the foam. Pour the foam into the cake tin and even it out. Bake for about 15-20 minutes, until the cake is a deep golden color. Remove from the oven and immediately work on the next layer.

5. In a double boiler or in the microwave melt the dark chocolate (from the second layer ingredients) with the butter, until smooth. 

6. In a mixer beat the eggs, sugar and coffee until you get a stiff foam (this takes a while, since these aren't just yolks). 

7. Gently fold the egg foam into the chocolate until you get an even colored cream. Pour the chocolate cream over the first layer of cake and return to the oven for about 15 minutes. Remove from the oven and allow to cool completely.

You can serve the cake like this, but if you want to make it even richer and also more beautiful, you can create this ganache topping:
1. Heat the heavy cream to a boil and then pour over the dark chocolate (from the topping ingredients). Stir until the chocolate is fully melted. Pour the chocolate over the cake, even it out and then freeze for at least 30 minutes to allow the chocolate to set.

2. In a microwave-safe bowl melt the white chocolate until smooth (do it in 30 second increments). Using a fork drizzle the white chocolate over the ganache topping. Allow to set in freezer or refrigerator.

If you prepared the cake in a spring-form pan you can gently remove it from the pan to serve. If not, just serve in the pan.

Enjoy!
  

Wednesday, December 1, 2010

Boston Cream Cake - GF

This is a recipe from Elizabeth Barbone's Easy Gluten Free Baking. It is listed as Boston Cream Pie, but actually makes more of a dense layer cake.

When I made it, the cake came out very thin after baking, and I was worried I would have a hard time cutting through it, but it ended up being easier than I thought, and the resulting cake was a good size.

Note that the filling needs to set for a while, so make it at least a few hours in advance.


Bostom Cream Cake 


 Ingredients: 

For the Filling:

* 2/3 cup milk 
* 1/3 cup granulated sugar
* 3/4 cup heavy cream
* 1/4 cup cornstarch
* 1 large egg yolk (save the white for the cake)  
* 2 teaspoons vanilla extract

For the Cake: 

* 1/4 cup vegetable shortening (I used butter)
* 3/4 cup white rice flour
* 2 tablespoons sweet rice flour
* 2 tablespoons cornstarch
* 1/4 teaspoon xantham gum
* 1/2 cup granulated sugar
* 1 teaspoon salt
* 1.5 teaspoons baking powder
*1/2 cup milk
* 1 large egg
* 1 egg white (left over from the filling)
* 1 teaspoon vanilla extract

For the Icing: 
* 4 ounces (about 100 grams) dark chocolate, coarsely chooped
* 1/2 cup heavy cream

Preparation: 

1. Prepare the filling: in a medium saucepan over medium-high heat, combine the milk and sugar. Heat, stirring, until the sugar is dissolved.

2. In a small bowl, vigorously whisk together the heavy cream, cornstarch and egg yolk.

3. Reduce the heat under the milk and sugar to low. While whisking the hot milk, very slowly pour the heavy cream mixture into the saucepan.

4. Increase the heat to medium. Whisk mixture constantly until it thickens, about 2.5 minutes. Remove filling from heat, continue to whisk mixture for an additional minute, then whisk vanilla into slightly cooled filling.

5. Pour filling into a large bowl. Place a piece of plastic wrap directly on the surface of the filling, to prevent it from forming a skin.

6. Refrigerate the filling for at least 4 hours, or overnight.

7. Prepare the cake: Preheat oven to 350 F (180 C). Grease a 9 inch (22 cm) round cake pan.

8. In a medium bowl, mix all ingredients for 2 minutes; batter will be thick (if you are using a stand mixture, set it on medium high).

9. Pour batter into pan and bake for 25 minutes or until a tester inserted into the center of the cake comes out clean.

10 remove cake from oven and allow to cool completely (you can take it out of the pan for faster cooling after about 5 minutes).

11. Prepare the icing: Place chopped chocolate into a large bowl.

12. In saucepan or microwave-safe bowl, bring cream to a boil and remove from heat.

13. Pour boiled cream over the chocolate. Stir, using a wooden spoon, until the chocolate melts and no lumps remain. Allow the icing to cool for 8 minutes.

14. Assemble the cake: Using a serrated knife, slice the cooled cake in half horizontally. Gently remove the top portion and set aside.

15. Spread all of the filling onto the bottom half of the cake. Top with reserved cake layer.

16. Ladle lightly cooled icing onto the cake. Refrigerate until ready to serve.

Monday, November 8, 2010

Salty Caramel Macadamia Nut and Chocolate Tart (GF/Non-GF options)

We were invited to a little party last week, and everyone was expected to bring something.
The same week, Israeli online news website ynet published this recipe for an amazing looking tart with macadamia nuts coated in a salty caramel and chocolate. The recipe is for a regular tart with wheat flour.
 For obvious reasons, I needed to make it with a gluten free pie crust. I used the recipe from Elizabeth Barbone's Easy Gluten Free Baking. This pie crust is really amazing. It genuinely tastes delicious and has a lovely texture. It is also very easy to work with the dough, unlike most GF doughs. For a Hebrew version of the GF pie crust, see here.

So here is the recipe both in it's original gluteny version and with the alternative, GF pie crust (which can also be used for many other recipes).

Salty Caramel Macadamia Nut and Chocolate Tart


Gluten free pie crust (for 9 inch/24 cm pie. Double for a larger one or for covered pie): 


Ingredients: 
* 1/2 cup white rice flour
* 1/4 cup cornstarch
* 1/4 cup potato starch
* 1.5 tsp white sugar
* 1/4 tsp salt
* 1/4 cup (half US stick) butter, diced.
* 1 large egg
* 1-2 tbsp cold water

Preparation: 

1. In a large bowl (or in a food processor) combine all of the dry ingredients. Using a fork (or pulsing in the food processor), combine the butter into the dry ingredients until you get a crumby looking mixture. Add the egg and the water and continue mixing/processing until you get a dough. If the dough is too dry, carefully add water, 1 tbsp at a time, until you get the right consistency.

2. Place the dough in a plastic bag and refrigerate for about an hour (I personally didn't find this crucial).

3. Roll the dough out and cover the pie tin with it, or just press globs of dough into the tin until the entire tin is covered at the desired thickness. Make sure not to roll the dough too thin, because it can crack/break very easily in the oven.

4. To pre-bake the pie crust (as needed for this recipe),  preheat the oven to 200 C/425 F. Pierce the pie shell with a fork to prevent rising. Bake for about 10-12 minutes, until the crust is golden. Set aside to cool.

Original, Non-GF pie crust from the recipe: 

Ingredients (for 24 cm/9 inch pie): 

* 250 grams (1 3/4 cups) flour
* 70 grams (1/2 cup) ground hazelnuts
* 70 grams (1/2 cup + 1 tablespoon) confectioners sugar
* 160 grams (about 5.5 oz) butter
* 1 egg

Preparation: 

1. In a food processor combine the flour, nuts, sugar and butter to a crumby mixture.

2. Add the egg and continue processing until you get moist doughy crumbs with no trace of the flour.

3. Combine the crumbs into a dough, cover in plastic and chill for 30 minutes.

4. Roll the dough out to a thin layer and cover the pie tin with it.

5. Preheat an oven to 180 C (375 F). Pierce the pie shell with a fork. Cover the shell with parchment paper and cover that with dried beans or a pie-weight to prevent rising. Bake for 15 minutes.

6. Remove the weight from the pie shell and bake for another five minutes until golden. Set aside to cool.

The actual pie (identical for both GF and non-GF versions): 

For the salty macadamia nuts: 

* 100 grams (1/2 cup) white sugar
* 100 ml (about 1/3 cup) heavy cream
* 1/2 tsp pure vanilla extract
* 1/4 tsp sea salt
* 1 cup (100 grams) lightly roasted macadamia nuts

For the chocolate filling: 

* 200 grams (7 ounces) dark chocolate
* 80 grams (about 3 ounces) milk chocolate
* 200 ml (about 2/3 cup) heavy cream
* 1 bottle cap of dark rum (I used light because that's what I had at home)

Preparation: 

1. In a medium sized pot on medium heat, melt the sugar carefully into an amber colored (but not too dark!) caramel. You can carefully move the pot from side to side to ensure that all the sugar melts.

2. Add the heavy cream (from the nut ingredients), vanilla and salt (careful! the cream will sizzle, and the caramel may harden. This is ok) and continue cooking for another two minutes, stirring constantly, until you get a thick sauce in which there are no hard bits of caramel (the hardened caramel will melt back into the cream as it heats up).

3. Allow to cool slightly, and then mix in the macadamia nuts, stirring to coat them. (Note: if you allow the nuts to cool too much in the caramel, they will become a hard chunk. Just carefully reheat the pot on a low heat to melt the caramel slightly so that you can spread the nuts on the pie).

4. Place the chocolates into  a bowl. Heat the heavy cream (from the chocolate sauce ingredients) to a simmer. Pour it over the chocolates and stir until the chocolates are melted and you have a smooth cream.

5. Stir the rum into the chocolate. Allow to cool slightly.

6. Build the pie: spread the caramel coated macadamia nuts on the pre-baked pie crust as evenly as you can. (Don't worry, there will be some areas with more nuts than others). Chill in the freezer for 5 minutes (I skipped this step).

7. Carefully pour the chocolate over the nuts, starting from the outside of the pie inwards, coating the pie evenly.

8. Chill the tart in the refrigerator for at least two hours before serving.


Friday, October 22, 2010

Super-Chocolatey Cookies (GF)

Many years ago I threw a party, for which I prepared a particularly wicked cookbook recipe for chocolate chip cookies. The recipe quickly became known among my friends as the "Death by Chocolate Chip Cookie" recipe, so named because the cookies were massive and each contained enough chocolate to fell a grown man.
The cookies were very well loved, but after a while I stopped making them, because there are only so many occasions for which you can make something as over-the-top extravagant as those cookies.

This recipe is a somewhat toned down version of the original. Don't get me wrong - these cookies are still extremely chocolate-y. They are also still about as far away from "diet food" as possible. However, compared to the truly staggering originals, they are somewhat saner. And they are certainly delicious.

Because they have so little flour in them, I made mine gluten free, but of course they can also be made using regular flour. 

Super Chocolatey Cookies


 Ingredients (for about 15 medium cookies): 

*   115 grams (about 4 ounces) dark chocolate, chopped (or high quality dark chocolate chips)
*  42 grams (about 1.5 ounces) cold butter, cubed
* 1 large egg
* 1/3 cup (75 grams, about 2.5 ounces) white sugar
* 2 tbsp gluten free flour (any neutral flavored kind will do) or regular flour
* 1/4 tsp baking powder
* a pinch of salt
* 200 grams (about 8 ounces) of chocolate chips of your choice (I used dark and white, but you can mix dark, white and milk, or whichever you prefer)

Preparation: 

1. Preheat oven to 180 C/375 F.

2. Line a baking pan with parchment paper.


3. Using a microwave, melt the dark chocolate (the first quantity listed) with the butter, by heating at 30 second increments and then stirring before continuing to heat.


4. Beat the egg and sugar together at high speed until a you get a very light yellow, fluffy mix.


5. Fold the melted chocolate into the egg mix.


6. Add the flour, baking powder and salt, and fold until just mixed.


7. Fold the chocolate chips into the mixture (for a prettier cookie, save 1/4 of the chips for decoration).the mixture will basically look like lots of chocolate chips covered in a rather liquid batter. That's totally fine.

8. With a spoon, make lumps of cookie batter on the lined pan. (If you saved some chocolate for decorating, sprinkle it on top of the cookies).

9. Bake for about 10 minutes. The cookies should be taken out of the oven when the sides are stable and no longer shiny, but the insides are still very moist. The cookies will look like they are not ready yet, but they will harden upon cooling!

10. allow the cookies to cool completely in the pan without touching them (they will fall apart if they are moved from the pan while warm). Keep in an airtight container at room temperature.