Showing posts with label Can be GF with special flour. Show all posts

Saturday, August 25, 2018

Scones with Home-Made Clotted Cream

I admit, I love a good British high tea. Finger sandwiches and elegant little cakes make me happy, but above all I can't resist a perfect scone, served with strawberry jam and fresh clotted cream.

For those who don't know it, clotted cream tastes like something of a hybrid between butter and whipped cream. It's rich, creamy, spreadable, but not sweet (hence the jam). In some places you can get store-bought packaged versions of it, but those are usually much less creamy and quite disappointing. I've tried making it at home before, but without success. So when a colleague recently posted about her luck making clotted cream at home using a method I hadn't tried before, I knew I had to try it, and it came out perfect!

Since I had clotted cream, I also had to make scones. I used this recipe as my guideline.  The ones you see in the picture are gluten free, made with a good quality all purpose GF flour. If you have one you can trust, give it a try.

Note: the clotted cream takes at least 20 hours to make, so make sure you plan ahead with it!

Scones with Home-Made Clotted Cream 


Clotted Cream (makes about 3/4 cup): 

Ingredient: 
-1.5 cup of heavy cream (try to find one that is not ultra-pasteurized, if you can)

Preparation: 
1.  Preheat your oven to a high temperature, about 190 C/374 F. When the oven is fully heated TURN IT OFF. We will be using the residual heat from the oven to make the cream.

2. Pour the heavy cream into a flat oven-safe dish. You want to have as much surface area as possible. Place the cream into the (turned-off!) oven, and leave it there for 12 hours (overnight is easiest). The cream should develop a weird-looking skin, and you may notice some separation of liquid. This is good.

3.  Carefully remove the dish from the oven, cover (e.g with cling wrap), and place in the refrigerator for 8 hours.

4.  Carefully skim the cream into a bowl. You essentially want to separate the harder, buttery top from the liquid in the bottom. Stir well until the skin is mixed into the cream.

5. At this point you will have clotted cream, but it may have some slightly harder bits in it because of the leftover skin. You can use the cream like this, if you like it. However, if you want to be a really perfect creamy texture, take a very fine sieve, and push the cream through the sieve to get rid of the chunkier bits. It's a bit of work to get all of the cream through, but well worth it!

Scones (makes 9 good-size scones):

Ingredients: 

 - 2 cups / 225 grams self-raising flour, or all purpose flour + 2 tsp of baking powder (if you have good all-purpose GF flour, you can use that).  
 
- pinch of salt

-  3.5 tbsp/ 55 grams  cold butter

-  2 tbsp/ 25 grams white sugar

- 3/4 cup / 150 ml milk

- 1 egg, beaten 


Preparation: 

1. Preheat oven to 220c/425 f. Line a baking sheet with parchment paper or lightly grease it.

2. Pour the flour into a large bowl and combine with the salt. Dice the butter into small dice, and add to the bowl. Using your fingers, rub the butter into the flour. The mixture should start to become crumbly and look a bit like sand.

3. Stir in the sugar and the milk until the mixture is just combined into a dough. It's very important not to over-work scones, or they won't rise properly.  You should get a dough that is soft and a little bit sticky. If it's too dry and crumbly, add a bit more milk, 1 tsp at a time. If it's too sticky then add a bit more flour, but be careful not to add to much flour or the dough will become hard.

4. Lightly flour a surface and turn the dough onto it. Knead very lightly (again, do not overwork!), and form a round, about 2 cm/ 3/4 inch thick.  Use a 5 cm/2 in cookie cutter (or a round glass) to cut out the scones and place on the lined baking sheet. It's best to use a sharp cutter and to cut firmly in one quick movement ,as too much messing around with the edges tends to seal them, which prevents rising. Take any left-over dough and gently knead it back into a round to cut some more scones.

5. Brush the tops of the scones with the beaten egg, and bake in the oven for 12-15 minutes, until risen and golden.  Allow to cool on a wire rack, and serve with clotted cream and good jam.

Enjoy!

Saturday, June 9, 2018

Knish (Onion and Potato Pastries)

A curious fact about Israel is that a lot of the foods typically associated with Jewish cuisine in the US, are virtually unknown to Israelis. For example, until a few years ago, you couldn't get a bagel in Israel to save your life, and even now supermarkets rarely sell them. Knishes are a similar deal. You can find Burkeas in every store, but I can't remember the last time I saw a knish anywhere.
So when a recurrences of pop-culture references to Knish made me crave some, there was no choice but to make them myself.

I opted for a version in which the potatoes and onion are mashed together to make a smooth filling, because I have a kid who will happily eat these just as long as there are no visible oniony-bits. If you prefer a bit more texture, add the onions in after you mash the potatoes.

The knishes can be made gluten free (the ones in the picture are!), but it does require having an excellent gluten free all purpose flour that you trust, as you do need to make a dough that is flexible enough to roll and delicious enough to eat.

Knish


 Ingredients (for 20-30 small knishes): 
For filling: 
- 3-4 potatoes (about 500 grams/1 lb), peeled and chopped into medium chunks.
- 1 large onion, diced.
- 3 tbsp oil, for frying.
- 1 tsp salt
- 1 tsp sugar (optional, although it gives a nice richness of flavor)
- 1/2 tsp black pepper 

For dough:
- 2 cups all purpose flour
- 1 tsp baking powder
- 1 egg
- 1/2 cup warm water
- 1/4 cup oil
- 1/2 tsp salt

For finishing: 
- 1 egg yolk beaten with a bit of milk

Preparation: 
1. Put the potatoes in a medium pot, cover with salted water, and cook on medium heat until the potatoes are soft. Drain.

2. While you wait, put frying oil in a pan, add the onions and cover. Sautee over medium-low heat until the onions are soft and translucent, then remove the lid and allow the onions to become golden-brown. Remove from heat.

3. Mash together the potatoes, onions, salt, sugar and pepper, either in a food processor, using a stick-blender, or using a masher, until very smooth. Remember: if you want to keep the onion texture, add the onions after the mashing process. Check for taste. The seasoning should be quite strong (stronger than you would want in mashed potatoes that you eat straight up), because there's only a bit of filling in each knish.

4. Prepare the dough: Preheat oven to 175 C/350 F. Line two baking sheets with parchment paper.  In a large bowl, beat the egg and water together, then add the oil and the salt and mix. Gradually add the flour, about 1/2 cup at a time, and mix thoroughly. When it starts to come together as a dough, start kneading, first in the bowl, then out on a well floured surface. The dough should feel smooth, not sticky, and elastic. If it's too sticky to knead comfortably, add some more flour. Knead for a few minutes to develop the gluten (or just until you have a usable nice dough, if you're making this GF).

5. Divide the dough into two balls. On a well floured surface, shape the first ball into a flat rectangle, and roll until very thin and quite large (about 30X20 cm, or 13X9 inches). Do the same with the other ball of dough.

6. Cut each rectangle into two, lengthwise (so you have two long and narrow pieces). Place about a quarter of the filling lengthwise along the center of each piece, then roll the dough (like a swiss roll) around the filling. Repeat for all the pieces.

7. Using a sharp knife, slice each roll into pieces, about 2.5 cm/1 inch long. Carefully lift each piece and place it, cut side down, in the baking tin, then gently push together the top section over the potato filling to slightly "close" the knish. This is a bit messy, and don't worry if it doesn't close altogether. The results are meant to be rustic.

8. When all of the knishes are placed on the baking tin, with a bit of distance between each one, brush them with the egg/milk mixture. Place in the over and bake for about 35-40 minutes, until the knishes are golden and fully baked.

Enjoy!


Friday, May 23, 2014

Cinnamon, Sour Cream and Hazelnut Cake

The first participant in the cookbook project is a lovely cake that would go great with tea or coffee in the afternoon.

The sour cream gives it a lovely moistness, and the cinnamon and brown sugar make it sweet and yummy.

I made it here with Cup4Cup gluten free flour and it came out great. If you have a GF flour mixture that you trust, give it a try. 

The book: "The Sweet Collection" (HaOsef Hamatok), by Israeli food empire "Al Hashulchan".
Language: Hebrew
Genre: sweet pastries and desserts
Veg Status: All of the recipes in the book are vegetarian. A few are vegan, but they are definitely in the minority.
GF Status: Like most baking books, it is not GF friendly, although there are some recipes for fancy, rich, mousse-type cakes that are naturally gluten free. Other recipes will require substitution with a good gluten free flour.

Cinnamon, Sour Cream and Hazelnut Cake


Ingredients: 

- 1 and 1/4 cup all purpose flour (or a gluten free equivalent that you trust)
- 1 tsp baking powder
- 1/2 tsp baking soda
- 1 cup (200 grams) white sugar
- 2 eggs
- 125 grams/about 4 oz butter, softened
- 200 ml/6.5 oz sour cream (I didn't have enough, so I used a combination of sour cream and a low-fat cream cheese)

For the filling
- 60 grams/1/3 cup dark brown sugar
- 100 grams/1 cup hazelnuts, lightly roasted and finely chopped (I used a combination of hazelnuts and almonds)
- 1 tbsp ground cinnamon

Preparation: 

1. Preheat oven to  200 C/390 F. Lightly grease a loaf tin or a small bundt cake tin.
2. In a bowl, combine the flour, baking soda and baking powder.
3. In a mixer, mix sugar, eggs and butter until smooth. Slow the mixer down and add the sour cream and flour gradually: 3 tbsp of flour, allow to mix, 1 tbsp of sour cream, allow to mix, and so on, until they are all mixed in and there is a  smooth batter.
4. Combine all of the filling ingredients together.
5. Put half of the batter in the baking tin. Top evenly with the filling. Top with the remainder of the batter.
6. Bake in preheated oven for about 35 minutes, or until a toothpick inserted in the middle of the cake comes out clean.


Monday, December 3, 2012

Personal Tartlets with various fillings

These little mini-tarts are a perfect party dish, because they are very easy to make, taste great, and are very easy to serve. These are just a few suggested fillings, but you can use whatever you want with the same technique.

I also made a gluten free version of these using Cup4Cup flour and the recipe here. It came out great (the tarts in the picture are gluten free).


Personal Tartlets


 To make these, you need to start out with a sheet of thinly rolled puff pastry, and a cupcake tin (one standard American pack of puff pastry made between 9-12 tarts for me).  Cut the puff pastry into squares, and line each hole of the cupcake tin with one square, to make little pastry "cups".  Fill the cups with whatever filling you want, and bake in a hot oven (430 f/200 C) for about 20 minutes, or until the pastry is golden-brown and fully cooked.

Sweet Potato Filling (for 12 tartlets):
- 2 large sweet potatoes, peeled and chopped into large chunks
- 1 pack of soft goat cheese
- A few sprigs of fresh thyme
- salt and pepper

Boil the potatoes in plenty of salted water, until soft. Drain and put in a bowl or return to pot. Mash the potatoes until quite smooth. Add the goat cheese and continue mashing until the cheese is fully incorporated into the potatoes. Season with salt and pepper and thyme leaves.

Potato filling: 
- 3 medium potatoes (or 2 very large), peeled and chopped into large chunks
- 2 tbsp milk (optional)
- handful grated cheese (cheddar or whatever you like) (optional)
- 2 eggs
- Salt, pepper, paprika

Boil the potatoes in plenty of salted water, until soft. Drain and put in a bowl or return to pot. Mosh the potatoes until smooth, adding the milk to help with creaminess. Add the cheese and eggs and mix well until incorporated. Season with salt, pepper and paprika.

Cheese filling:
This really isn't so much a recipe as an idea. Basically, take a bowl, and in it combine a mixture of softer and harder cheeses, as well as an egg or two and some seasoning, to create a thick liquid filling which you can pour into the cups. For my filling I use: 1 medium package of 2% greek yogurt, 1 small package of cream cheese or mascarpone, 2 eggs, and a couple of handfuls of a mixture of grated Parmesan and mozzarella, seasoned with salt and pepper. You can also add fresh herbs to the mix.


Wednesday, January 25, 2012

Naan bread

Yes, it's once again Indian Food time at our house.
This time, we made Naan bread.The recipe is based  on the one here.
We made it GF with Cup4Cup flour and it came out very nice, but I'm not sure it'll work with other kinds of GF flour. 

Naan Bread


Ingredients (for 8 Naans): 
-1.5 tsp active dry yeast
- 1 cup warm water
- 1.5 tsp sugar
-3 cups all purpose flour
-1 tsp salt
- 6 tbsp ghee (clarified butter) or oil
- 3 tbsp yogurt or sour cream

Preparation: 
1. Add the yeast to the warm water and sugar. Leave aside for 10 minutes until it begins to bubble.

2. In a large mixing bowl (or the bowl of a mixer) combine the flour and the salt. Add the yeast mixture, the yogurt and half of the ghee/oil. 

3. With your hands or a mixer, knead until a soft, elastic dough forms (if you use GF flour it will be less elastic).

4. Place the dough into a bowl, lightly oiling it to prevent drying. Cover the bowl and allow to rise in a warm area (if your house is not very warm, put it in a very slightly warmed oven) for 90 minutes, until about doubled in size.

5. Preheat oven to 200 C/400 F. Punch down the dough and divide it into eight equal balls. On a lightly floured surface, roll each ball into a flat round, about 7-8"/ 18" in diameter.

6. Cover a baking tray with lightly oiled aluminum foiled. Put the naan's on the tray, making sure they don't touch each other (you will probably need more than one tray). Brush with oil/ghee and put in the hot oven, baking until the naan puffs and turns golden (this will take about 7 minutes), then turn around and bake a bit more (about 3 minutes). Remove from oven and serve.


Wednesday, November 23, 2011

Krantz (yeast cake) with Nutella and Halva filling (with GF option)

This is a Krantz, which is a braided yeast cake (not to be confused with Frankfurter Kranz). You can fill the dough with any filling you like and braid it using the same technique. This particular version, made from a recipe from pastry chef Karin Goren is filled with Nutella and bits of halva - a middle-eastern treat made from sesame. However, if you can't get your hands on halva, just nutella will work as well.
The result is a firm, warm, fragrant cake, filled with gooey delicious chocolatey goodness.

For the gluten free version (which you see in the picture) I simply substituted the regular flour with the same weight of Cup4Cup gluten free flour, and it worked fabulously well. Easy to work with and delicious. I did have to add a tiny bit more milk to the dough to get it to mix, but other than that it was the same recipe. Since this is the third recipe I've published with this flour, I think I should make it clear that of course I am not an advertiser for the flour nor do I have any connections with C4C or its manufacturers. I've just been finding it a really great flour to work with. 


Krantz (yeast cake) with Nutella and Halva Filling 


Ingredients (for 2 cakes, each made in a small loaf pan or  "English cake" tin): 

For the dough:
- 500 grams/17 oz all purpose flour (or cup4cup gluten free flour)
- 1 tbsp active dry yeast
- 100 grams/3.5 oz/6 tbsp butter
- 150 ml (a little over 1/2 cup) milk
- 2 eggs, room temperature
- 6 tbsp sugar
- 1/2 tsp salt

For the filling: 
- 1 cup nutella
- 100 grams/3.5 oz halva ( In the US, Joyva makes gluten free halva)

- 1 egg, whisked, for egg wash

Preparation: 

1. In a mixer with a dough hook, combine the flour with the yeast. Melt the butter, allow to chill a bit, and add to the flour together with the milk, eggs and sugar. Mix in medium speed until you get a dough (if necessary, add a bit more milk). Add the salt, and keep working the dough in the mixer for another five minutes, until you get a smooth, shiny and slightly sticky dough. (Note: you can do all this by hand if you don't have a mixer)

2. Cover the bowl with plastic wrap, and leave the dough to rise in a warm place for a couple of hours, until doubled - or overnight in the fridge.

3. Divide the risen dough into two equal parts. Roll each dough into a rectangle about 1/2 cm/1/4 inch thick. Spread each rectangle with half of the Nutella spread and then sprinkle with half of the halva. Roll each rectangle into a roulade.

4. Slice one roulade down the middle, so that you get two lengths of dough layered with filling. Carefully turn the two pieces on their side, so that the part with the exposed filling is on top. Press one end of the two pieces together and then gently "braid" them (you can see the picture of this  here ). Do this for the other roulade, and gently transfer each one of them into a small loaf tin or long cake tin.

5. Allow the cakes to rise until about doubled. Gently brush with egg wash. Preheat oven to 180 C/350 F. Bake for about 25-30 minutes, until the cakes are fragrant and beautifully browned. If you gently knock on the dough, the cake will make a hollow sound. 

These are best served slightly warm, but are also delicious cold.


Friday, November 11, 2011

Challah (with GF option)

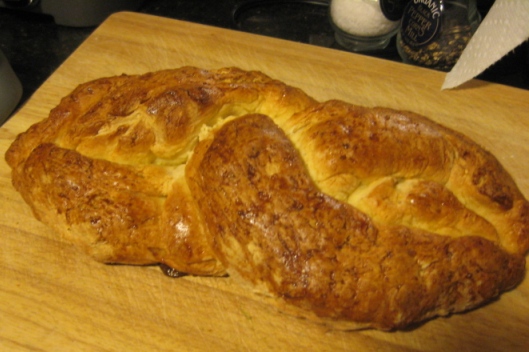
Making challah is really one of things that I like doing when I'm feeling a bit homesick or want to really feel like it's Friday. There's nothing like having the whole house smell of baking, and then get that beautiful golden loaf out of the oven. And if there are any leftovers, they also make the best french toast.  My favorite challahs are the ones that aren't particularly sweet, so this recipe is for a not-very-sweet challah.

The joy of baking challah is something I've mostly given up since celiac entered our lives, because messing around with all that flour is not a great idea. There is the GF challah recipe I posted on Rosh Hashana. However, it's complicated and the results, while decent, are not quite satisfying enough. Then this week I saw that Cup4Cup flour (the new flour I mentioned in a recent post) published a recipe for bagels that looked really easy and convincing. I gave it a try and was pretty happy with the results. I therefore decided that it was time to put this flour to the ultimate test: would it really work when used, cup for cup, instead of regular flour, in a regular recipe, for bread?!?
Most gluten free flours would fail this test outright. However, C4C actually did pretty well. The challah you see in the picture is, in fact, entirely gluten free. The dough behaved almost exactly like gluteny dough and was easy to work with. The result is not quite as fluffy and wonderful as regular fresh challah, but it's pretty darn close as a substitute! Overall, C4C deserves outstanding marks as a GF flour that really works.

So here is the Challah recipe, in it's regular, non-GF version, which can also be made GF using Cup4Cup flour.NOTE that the recipe does require quite a long rising and baking time, so don't make this at the last minute.

Challah


Ingredients (for one large challah loaf): 

- 1.25 cup warm water 
- 1.5 tsp active dry yeast 
- 1/4 cup of honey 
- 2 tbsp vegetable oil 
- 1 egg + extra for eggwash
- 1.5 tsp salt
- 4 cups all purpose flour (or GF Cup4Cup flour) + extra for flouring

Preparation: 

1. Pour the warm water into a large bowl. Sprinkle the yeast over the water. Add the honey, oil, egg and salt. Mix well. Gradually add in the flour, mixing as you go along (you can also use a mixer with dough hook for this). When the flour is incorporated, knead until you get a smooth dough that no longer feels sticky (if you are making the GF version, there's not much point in a lot of kneading, since there is no gluten to develop. Just knead it a bit until it feels like a cohesive dough that isn't too sticky). Cover the bowl with a clean damp kitchen towel and allow to rise for 1.5 hours. 

2. Punch down the risen dough and put on a floured surface (for GF dough you may need a bit more flour, if it feels a bit stick). Knead the dough for about five minutes (again, if you are using GF, just knead it a bit until it is easy to work with). Divide the dough into three equal parts, shape each part into a long snake, attach the three snakes at one end and then braid them. Oil a baking tin or cover it with parchment paper, and put the challah on the tin. if your challah looks a bit bumpy - which can happen especially with the GF dough, moisten your hands a bit with water and gently rub the challah with moistened hands to smooth it up a bit.   Cover with a damp kitchen towel and allow to rise for another hour. 

3. Preheat oven to 375 F/180 C. Brush the challah with egg. Bake for about 30-40 minutes, until the challah is golden-brown and makes a hollow sound when you knock on the bottom of it.  


Enjoy!

Thursday, October 20, 2011

Butternut Squash Ravioli (with GF option)

 Little ravioli pockets filled with a mixture of butternut squash (or pumpkin), cheeses and some onion and herbs. The filling is  vaguely based on this recipe from Epicurious. However, since I had no goat cheese and no sage, I  improvised.

GF matters: Ok, now I know the last recipe I posted was sort of similar to ravioli. However, on a recent trip to Williams-Sonoma we discovered a new gluten free flour called C4C. It's made by the people from the French Laundry restaurant. The flour is only available at Williams-Sonoma at the moment, and it costs about 20$ for a 3 lb bag, which means it's about the same price as King Arthur's GF flour, but pricier than some other brands, such as Gluten Free Pantry. However, the info on the bag promised it would be easier to work with than other flours, so we decided to give it a try.

Last night I went on their website look for recipes, and came up with a recipe for pasta dough. I haven't had much luck to date making fresh pasta from GF flour, and this seemed like a good opportunity to give it another try. I made half of the recipe quantity (using 6 yolks and 1 egg), and to my surprise I ended up with a reasonably elastic dough that was not too sticky. The dough proved a little bit finicky when I tried to run it through my mixer's trusty pasta-maker attachment, but once I realized the trick of  taking relatively small balls of dough and rolling them to a sheet about 1/2 inch thick before pushing them through the maker, the dough started to act decidedly like regular pasta dough. I managed to get it as far as the #5 setting on my maker, and I'm sure I could have kept going if I wanted to. Bottom line: the resulting ravioli were very easy to shape, and the dough was light and thin and tasted just like regular pasta dough. Now, it's possible you would get the same results using this recipe with a different flour mix, but all in all I was quite happy with this one

Butternut Squash Ravioli 


Ingredients (for about 20 ravioli): 

- Ravioli dough, prepared and rolled to a very thin sheet (You can use this regular recipe, or one half of this gluten free recipe, or you can use store-bought ravioli/wonton wrappers.

For the filling: 
- 1 butternut squash or small pumpkin, cut in half and deseeded (or some squash/pumpkin puree, or some frozen squash cubes).
- 1 medium onion, finely chopped.
- Some herbs, finely chopped (I used basil and mint, but use whatever you have, or skip)
- 1 tbsp butter
- 2 tbsp cream cheese or soft goat's cheese
- a few tbsp grated parmesan cheese
- a handful of grated mozzarella cheese (optional)
- Salt and pepper

Serving option (you can also use a sauce of your choice): 
- 2-4 tbsp olive oil.
- 2 cloves of garlic, minced
- red pepper flakes
- 2-3 tbsp grated parmesan

Preparation: 
1. Preheat oven to 425 F/ 200 C. Place the squash or pumpkin on a baking tin and roast in the oven for about 30 minutes, or until soft. If you are using puree, skip this step and just put it in a bowl. If you are using frozen cubes, place them on a tin and roast them, but you will need less than 30 minutes to get them soft. 

2. While the squash is roasting, melt the butter in a small pan and fry the onion until soft and slightly browned. Add the herbs and fry a bit more. Set aside.

3. When the squash is cooked and slightly cooled, scoop the flesh of the squash into a bowl (or place the roasted cubes into it), and mash with a fork to make a relatively smooth puree. Add the onion mixture. Add the cheeses and mix well. Season with salt and pepper. 

4. Make the ravioli: place scoops of the filling on half of the ravioli dough. Brush water or egg around the scoops (to help things stick), then top with the other half of the dough. Push the dough down around each of the scoops, so that you get dough with little round "hills" of filling. Using a large cookie-cutter or a knife, cut around the "hills" to make ravioli (make sure to leave a little bit of unfilled dough around each scoop, so the filling doesn't fall out). Carefully transfer the ravioli to a plate, making sure to tighten the edges of each one as you do.

5. Heat water in a large pot and slightly salt it. When it is boiling, carefully put the ravioli into it and cook, stirring gently, until the ravioli look cooked (the dough should be softened and turn whiter).

6. While the water is boiling, prepare the sauce (if you plan to use it): heat the olive oil in a large pan. Add the garlic and cook until the garlic softened and turns a bit golden. When the ravioli are ready, drain them and add them to the pan with the oil and garlic. Season with salt, pepper and red pepper flakes, stirring gently to coat the ravioli in the sauce.  Plate the ravioli and top with grated parmesan.